These instructions are for a very basic simple sofa, with photographs illustrating the steps you need to take to make a dollhouse sofa from cardboard and fabric. If you want to make little cushions for your sofa ,chair,bed or whatever, sand makes the best filling. Sand gives the cusion some weight and it will look very realistic. You can even imprint the pillow with a dent as if a little head was recently resting there. This is a well known mini hint, certainly not my idea. It is an extremely effective technique though for something so simple, and goes a long way to making your miniature look realistic. |
|
Let's Build a Dollhouse Sofa When you are just starting out with a new dollhouse, it takes a while
to fill it with furniture. It would be great fun to buy everything,
but this is not always feasible, so making some of the furniture is
a good option. It is much easier for me to actually make a dollhouse sofa, than
to explain in writing how to do it, so I have taken photographs and
given step by step instuctions with each photo. I hope you can understand
them.For the sake of simplicity, this sofa has one seat pad and one back
cushion, you can have two or three cushions.As well you can change the shape of the arms or add a pleated /
frilly skirt.I recommend using cotton for the fabric, cotton irons nice and flat
and won't stretch like some other fabrics. |
 |
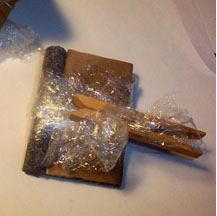
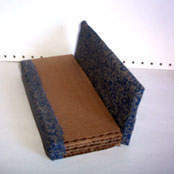
These are all the parts of the sofa. The base of the sofa
is 4 layers of cardboard. The back and arms are 2 layers of cardboard. The seat and back cushion are 2 layers of cardboard and 1 layer of craft foam for padding. You also need 2 pieces of dowel the same width as the arms. [I used the handles of foam brushes for this]. You can also roll some paper to use for the arms,or make some from polymer clay. |
 |
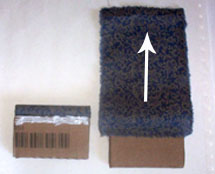
Cut out fabric for each pieceof the sofa adding a 1
inch allowance on each side for folding over the edges. Cover the dowel and make sure that the fabric for the arm is long enough to wrap around the arm plus the dowel. You don't have to cover the whole base, the deck won't show [that's the part of the sofa that is under the seat cushion]. |
 |
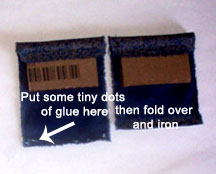
Lay the cardboard piece on one end of the fabric. fold
the fabric around the sides and front. Glue down using straight pins to hold it in place. Fold down the edges on the other end of the fabric. Use a few dots of glue and iron nice and flat. |
 |
The dowel has to be glued to the top of the arm. Try
to glue them a bit off centre. You don't have to be stingy with the glue here, it won't show. I use plastic wrap to clamp awkward things together, just wrap it snuggly and hold it with a clothes pin. Always give the glue time to dry. |
 |
Put some glue under the dowel all the way across. Lay the fabric along the glue and press down well. It doesn't matter if the glue shows through it will be covered. Do this on both arms and wait for the glue to dry. |
 |
Turn the arm over and wrap the fabric over the dowel
and all the way around the arm. The folded edge will be glued right under the dowel so make sure to measure it that way. Fold and glue the raw edges as shown. |
 |
Glue the folded edge right under the dowel. Press it
down firmly and hold it with straight pins or clothes pegs until the
glue is dry. |
 |
Here is a birds eye view of the sofa arm. Glue down the excess fabric over the front and back of the arm. Snip with scissors as you go where need be. |
 |
Make 2 templates the shape of the front of the sofa arms. |
 |
Make a pattern [shown yellow] about 1/4 inch larger than the template. |
 |
Pin the pattern onto the fabric and cut it out. Snip around the edge about every 1/4 inch about 1/8th inch deep snips. |
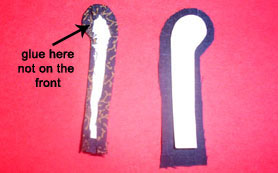 |
Glue the edges of the fabric onto the template as you fold all the fabric over. Make sure one arm is facing right and one facing left. Iron nice and flat. Now glue these onto the front of the arms. If you want you can cover the back end the arms the same way, whether I do that or not depends on how neat it looks and where it is going. |
 |
Attach the back to the base. Use glue and hold it together
with straight pins until the glue dries. we will attach the arms the same
way. Add the seat cushion and back cushion. You can glue these or not it is up to you. When you have the cushions in place glue and straight pin the arms onto your sofa. |
 |
Use pins to hold the back and arms in place. If the sofa is for an adult's dollhouse you can leave the pins in there. If a child will be playing with it, of course, the pins will have to come out when the glue is dry. |
 |
|
|
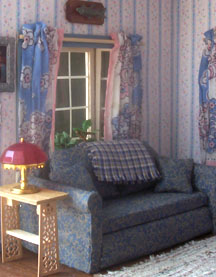
Add some beads to the bottom of the sofa for 'legs'.There you have it! An easy peasy sofa. I would suggest that you make a very simple sofa or chair on you first try and if you want to get fancy after that, there is no limit to what you may come up with.Have Fun Mini-ing |
|


Jennifer Brooks 2003-2021 |
|---|